Unity で AI サポートを使用して FPS を作成する方法
一人称シューティング ゲーム (FPS) は、プレイヤーが一人称視点で操作されるシューティング ゲームのサブジャンルです。
Unity で FPS ゲームを作成するには、プレイヤー コントローラー、一連のアイテム (この場合は武器)、および敵が必要です。
ステップ 1: プレーヤー コントローラーを作成する
ここでは、プレーヤーが使用するコントローラーを作成します。
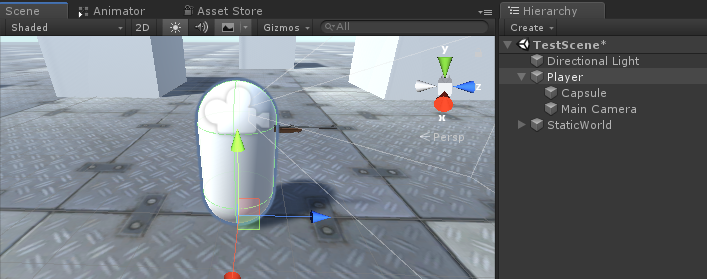
- 新しいゲーム オブジェクトを作成し (ゲーム オブジェクト -> 空の作成)、名前を付けます。 "Player"
- 新しいカプセルを作成し (ゲーム オブジェクト -> 3D オブジェクト -> カプセル)、"Player" オブジェクト内に移動します。
- Capsule Collider コンポーネントを Capsule から削除し、その位置を (0, 1, 0) に変更します。
- メイン カメラを "Player" オブジェクト内に移動し、その位置を (0, 1.64, 0) に変更します。
- という新しいスクリプトを作成し、"SC_CharacterController" という名前を付けて、その中に以下のコードを貼り付けます。
SC_CharacterController.cs
using UnityEngine;

[RequireComponent(typeof(CharacterController))]

public class SC_CharacterController : MonoBehaviour
{
    public float speed = 7.5f;
    public float jumpSpeed = 8.0f;
    public float gravity = 20.0f;
    public Camera playerCamera;
    public float lookSpeed = 2.0f;
    public float lookXLimit = 45.0f;

    CharacterController characterController;
    Vector3 moveDirection = Vector3.zero;
    Vector2 rotation = Vector2.zero;

    [HideInInspector]
    public bool canMove = true;

    void Start()
    {
        characterController = GetComponent<CharacterController>();
        rotation.y = transform.eulerAngles.y;
    }

    void Update()
    {
        if (characterController.isGrounded)
        {
            // We are grounded, so recalculate move direction based on axes
            Vector3 forward = transform.TransformDirection(Vector3.forward);
            Vector3 right = transform.TransformDirection(Vector3.right);
            float curSpeedX = canMove ? speed * Input.GetAxis("Vertical") : 0;
            float curSpeedY = canMove ? speed * Input.GetAxis("Horizontal") : 0;
            moveDirection = (forward * curSpeedX) + (right * curSpeedY);

            if (Input.GetButton("Jump") && canMove)
            {
                moveDirection.y = jumpSpeed;
            }
        }

        // Apply gravity. Gravity is multiplied by deltaTime twice (once here, and once below
        // when the moveDirection is multiplied by deltaTime). This is because gravity should be applied
        // as an acceleration (ms^-2)
        moveDirection.y -= gravity * Time.deltaTime;

        // Move the controller
        characterController.Move(moveDirection * Time.deltaTime);

        // Player and Camera rotation
        if (canMove)
        {
            rotation.y += Input.GetAxis("Mouse X") * lookSpeed;
            rotation.x += -Input.GetAxis("Mouse Y") * lookSpeed;
            rotation.x = Mathf.Clamp(rotation.x, -lookXLimit, lookXLimit);
            playerCamera.transform.localRotation = Quaternion.Euler(rotation.x, 0, 0);
            transform.eulerAngles = new Vector2(0, rotation.y);
        }
    }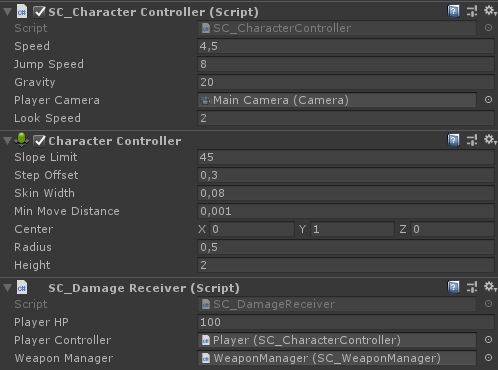
}- SC_CharacterController スクリプトを "Player" オブジェクトにアタッチします (Character Controller と呼ばれる別のコンポーネントも追加され、その中心値が (0, 1, 0) に変更されていることがわかります)
- SC_CharacterController の Player Camera 変数に Main Camera を割り当てます。
これでプレーヤー コントローラーの準備が整いました。
ステップ 2: 武器システムを作成する
プレイヤーの武器システムは、武器マネージャー、武器スクリプト、バレット スクリプトの 3 つのコンポーネントで構成されます。
- という新しいスクリプトを作成し、"SC_WeaponManager" という名前を付けて、その中に以下のコードを貼り付けます。
SC_WeaponManager.cs
using UnityEngine;

public class SC_WeaponManager : MonoBehaviour
{
    public Camera playerCamera;
    public SC_Weapon primaryWeapon;
    public SC_Weapon secondaryWeapon;

    [HideInInspector]
    public SC_Weapon selectedWeapon;

    // Start is called before the first frame update
    void Start()
    {
        //At the start we enable the primary weapon and disable the secondary
        primaryWeapon.ActivateWeapon(true);
        secondaryWeapon.ActivateWeapon(false);
        selectedWeapon = primaryWeapon;
        primaryWeapon.manager = this;
        secondaryWeapon.manager = this;
    }

    // Update is called once per frame
    void Update()
    {
        //Select secondary weapon when pressing 1
        if (Input.GetKeyDown(KeyCode.Alpha1))
        {
            primaryWeapon.ActivateWeapon(false);
            secondaryWeapon.ActivateWeapon(true);
            selectedWeapon = secondaryWeapon;
        }

        //Select primary weapon when pressing 2
        if (Input.GetKeyDown(KeyCode.Alpha2))
        {
            primaryWeapon.ActivateWeapon(true);
            secondaryWeapon.ActivateWeapon(false);
            selectedWeapon = primaryWeapon;
        }
    }
}- 新しいスクリプトを作成し、"SC_Weapon" という名前を付け、その中に以下のコードを貼り付けます。
SC_武器.cs
using System.Collections;
using UnityEngine;

[RequireComponent(typeof(AudioSource))]

public class SC_Weapon : MonoBehaviour
{
    public bool singleFire = false;
    public float fireRate = 0.1f;
    public GameObject bulletPrefab;
    public Transform firePoint;
    public int bulletsPerMagazine = 30;
    public float timeToReload = 1.5f;
    public float weaponDamage = 15; //How much damage should this weapon deal
    public AudioClip fireAudio;
    public AudioClip reloadAudio;

    [HideInInspector]
    public SC_WeaponManager manager;

    float nextFireTime = 0;
    bool canFire = true;
    int bulletsPerMagazineDefault = 0;
    AudioSource audioSource;

    // Start is called before the first frame update
    void Start()
    {
        bulletsPerMagazineDefault = bulletsPerMagazine;
        audioSource = GetComponent<AudioSource>();
        audioSource.playOnAwake = false;
        //Make sound 3D
        audioSource.spatialBlend = 1f;
    }

    // Update is called once per frame
    void Update()
    {
        if (Input.GetMouseButtonDown(0) && singleFire)
        {
            Fire();
        }
        if (Input.GetMouseButton(0) && !singleFire)
        {
            Fire();
        }
        if (Input.GetKeyDown(KeyCode.R) && canFire)
        {
            StartCoroutine(Reload());
        }
    }

    void Fire()
    {
        if (canFire)
        {
            if (Time.time > nextFireTime)
            {
                nextFireTime = Time.time + fireRate;

                if (bulletsPerMagazine > 0)
                {
                    //Point fire point at the current center of Camera
                    Vector3 firePointPointerPosition = manager.playerCamera.transform.position + manager.playerCamera.transform.forward * 100;
                    RaycastHit hit;
                    if (Physics.Raycast(manager.playerCamera.transform.position, manager.playerCamera.transform.forward, out hit, 100))
                    {
                        firePointPointerPosition = hit.point;
                    }
                    firePoint.LookAt(firePointPointerPosition);
                    //Fire
                    GameObject bulletObject = Instantiate(bulletPrefab, firePoint.position, firePoint.rotation);
                    SC_Bullet bullet = bulletObject.GetComponent<SC_Bullet>();
                    //Set bullet damage according to weapon damage value
                    bullet.SetDamage(weaponDamage);

                    bulletsPerMagazine--;
                    audioSource.clip = fireAudio;
                    audioSource.Play();
                }
                else
                {
                    StartCoroutine(Reload());
                }
            }
        }
    }

    IEnumerator Reload()
    {
        canFire = false;

        audioSource.clip = reloadAudio;
        audioSource.Play();

        yield return new WaitForSeconds(timeToReload);

        bulletsPerMagazine = bulletsPerMagazineDefault;

        canFire = true;
    }

    //Called from SC_WeaponManager
    public void ActivateWeapon(bool activate)
    {
        StopAllCoroutines();
        canFire = true;
        gameObject.SetActive(activate);
    }
}- 新しいスクリプトを作成し、"SC_Bullet" という名前を付け、その中に以下のコードを貼り付けます。
SC_Bullet.cs
using System.Collections;
using UnityEngine;

public class SC_Bullet : MonoBehaviour
{
    public float bulletSpeed = 345;
    public float hitForce = 50f;
    public float destroyAfter = 3.5f;

    float currentTime = 0;
    Vector3 newPos;
    Vector3 oldPos;
    bool hasHit = false;

    float damagePoints;

    // Start is called before the first frame update
    IEnumerator Start()
    {
        newPos = transform.position;
        oldPos = newPos;

        while (currentTime < destroyAfter && !hasHit)
        {
            Vector3 velocity = transform.forward * bulletSpeed;
            newPos += velocity * Time.deltaTime;
            Vector3 direction = newPos - oldPos;
            float distance = direction.magnitude;
            RaycastHit hit;

            // Check if we hit anything on the way
            if (Physics.Raycast(oldPos, direction, out hit, distance))
            {
                if (hit.rigidbody != null)
                {
                    hit.rigidbody.AddForce(direction * hitForce);

                    IEntity npc = hit.transform.GetComponent<IEntity>();
                    if (npc != null)
                    {
                        //Apply damage to NPC
                        npc.ApplyDamage(damagePoints);
                    }
                }

                newPos = hit.point; //Adjust new position
                StartCoroutine(DestroyBullet());
            }

            currentTime += Time.deltaTime;
            yield return new WaitForFixedUpdate();

            transform.position = newPos;
            oldPos = newPos;
        }

        if (!hasHit)
        {
            StartCoroutine(DestroyBullet());
        }
    }

    IEnumerator DestroyBullet()
    {
        hasHit = true;
        yield return new WaitForSeconds(0.5f);
        Destroy(gameObject);
    }

    //Set how much damage this bullet will deal
    public void SetDamage(float points)
    {
        damagePoints = points;
    }
}
ここで、SC_Bullet スクリプトにいくつかのエラーがあることがわかります。それは、IEntity インターフェイスを定義するという最後にやるべきことが 1 つあるためです。
C# のインターフェイス は、それを使用するスクリプトに特定のメソッドが実装されていることを確認する必要がある場合に便利です。
IEntity インターフェイスには、ApplyDamage という 1 つのメソッドがあり、後で敵とプレイヤーにダメージを与えるために使用されます。
- 新しいスクリプトを作成し、"SC_InterfaceManager" という名前を付け、その中に以下のコードを貼り付けます。
SC_InterfaceManager.cs
//Entity interafce
interface IEntity
{
    void ApplyDamage(float points);
}
武器マネージャーのセットアップ
武器マネージャーは、メイン カメラ オブジェクトの下に存在し、すべての武器を含むオブジェクトです。
- 新しいゲームオブジェクトを作成し、名前を付けます "WeaponManager"
- WeaponManager をプレイヤーのメインカメラ内に移動し、その位置を (0, 0, 0) に変更します。
- SC_WeaponManager スクリプトを "WeaponManager"
- SC_WeaponManager の Player Camera 変数に Main Camera を割り当てます。
ライフルのセットアップ
- 銃のモデルをシーンにドラッグ アンド ドロップします (モデルがまだない場合は、単純にキューブを作成して引き伸ばします)。
- モデルのサイズがプレーヤー カプセルに相対するようにスケールします。
私の場合、カスタムメイドのライフルモデル (BERGARA BA13) を使用します。

- 新しいゲームオブジェクトを作成し、"Rifle" という名前を付けて、その中にライフル モデルを移動します。
- "Rifle" オブジェクトを "WeaponManager" オブジェクト内に移動し、次のようにカメラの前に配置します。
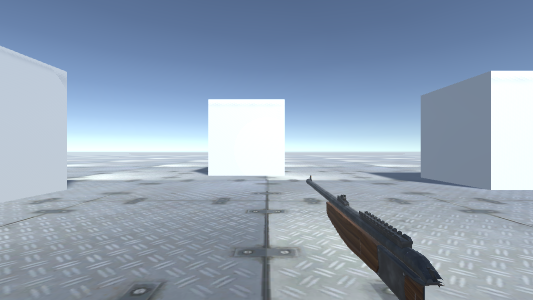
オブジェクトのクリッピングを修正するには、カメラのニア クリッピング プレーンをより小さいものに変更するだけです (私の場合は 0.15 に設定しました)。
ずっといい。
- SC_Weapon スクリプトを Rifle オブジェクトにアタッチします (オーディオ ソース コンポーネントも追加されていることがわかります。これは発砲とオーディオのリロードに必要です)。
ご覧のとおり、SC_Weapon には割り当てる変数が 4 つあります。プロジェクトに適切なオーディオ クリップがある場合は、Fire オーディオ変数と Reload オーディオ変数をすぐに割り当てることができます。
Bullet Prefab 変数については、このチュートリアルの後半で説明します。
ここでは、Fire point 変数を割り当てるだけです。
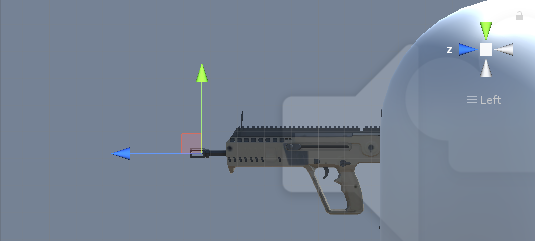
- 新しいゲームオブジェクトを作成し、名前を "FirePoint" に変更して、Rifle オブジェクト内に移動します。次のように、バレルの直前または少し内側に置きます。
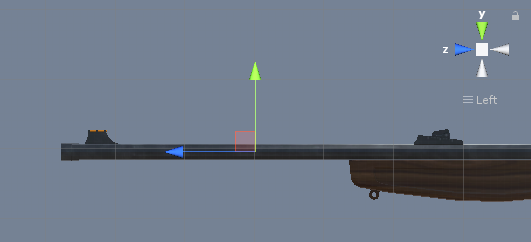
- FirePoint Transform を SC_Weapon の Fire point 変数に割り当てます
- SC_WeaponManager スクリプトのセカンダリ武器変数にライフルを割り当てる
サブマシンガンのセットアップ
- Rifle オブジェクトを複製し、名前を Submachinegun に変更します
- 中の銃モデルを別のモデルに置き換えます(私の場合はTAVOR X95のカスタムメイドモデルを使用します)

- 新しいモデルに適合するまで Fire Point トランスフォームを移動します
- SC_WeaponManager スクリプトでサブマシンガンをプライマリ ウェポン変数に割り当てます

Bullet プレハブのセットアップ
弾丸プレハブは武器の発射速度に従って生成され、レイキャストを使用して何かに命中してダメージを与えたかどうかを検出します。
- 新しいゲームオブジェクトを作成し、名前を付けます "Bullet"
- それに Trail Renderer コンポーネントを追加し、その Time 変数を 0.1 に変更します。
- 幅カーブを低い値に設定します (例: 開始 0.1 終了 0)。尖った外観の軌跡を追加します。
- 新しいマテリアルを作成し、bullet_trail_material という名前を付け、その Shader を Particles/Additive に変更します。
- 新しく作成したマテリアルをトレイル レンダラーに割り当てる
- Trail Renderer の色を別の色に変更します (例: 開始: 明るいオレンジ色、終了: 濃いオレンジ色)

- Bullet オブジェクトを Prefab に保存し、シーンから削除します。
- 新しく作成したプレハブ (プロジェクト ビューからドラッグ アンド ドロップ) を Rifle および Submachinegun Bullet プレハブ変数に割り当てます
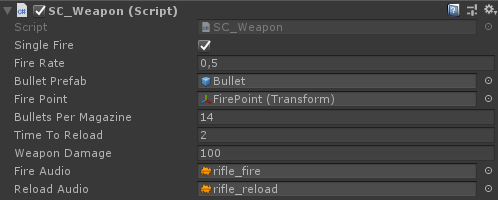
小型機関銃:
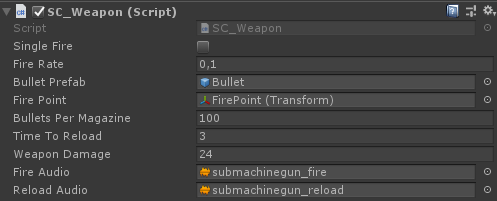
ライフル:
これで武器の準備が整いました。
ステップ 3: 敵 AI を作成する
敵は単純なキューブであり、プレイヤーを追いかけ、十分に近づくと攻撃します。彼らは波状に攻撃し、波ごとに排除すべき敵が増えます。
敵AIのセットアップ
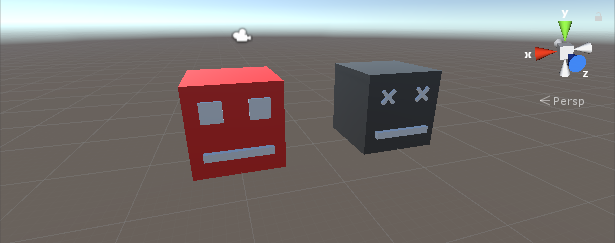
以下では、キューブの 2 つのバリエーションを作成しました (左側は生きているインスタンス用で、右側は敵が殺されると生成されます)。
- Rigidbody コンポーネントを死んだインスタンスと生きたインスタンスの両方に追加します
- 死んだインスタンスをプレハブに保存し、シーンから削除します。
ここで、生きているインスタンスがゲーム レベルを移動してプレイヤーにダメージを与えることができるようにするには、さらにいくつかのコンポーネントが必要になります。
- 新しいスクリプトを作成して "SC_NPCEnemy" という名前を付け、その中に以下のコードを貼り付けます。
SC_NPCEnemy.cs
using UnityEngine;
using UnityEngine.AI;

[RequireComponent(typeof(NavMeshAgent))]

public class SC_NPCEnemy : MonoBehaviour, IEntity
{
    public float attackDistance = 3f;
    public float movementSpeed = 4f;
    public float npcHP = 100;
    //How much damage will npc deal to the player
    public float npcDamage = 5;
    public float attackRate = 0.5f;
    public Transform firePoint;
    public GameObject npcDeadPrefab;

    [HideInInspector]
    public Transform playerTransform;
    [HideInInspector]
    public SC_EnemySpawner es;
    NavMeshAgent agent;
    float nextAttackTime = 0;

    // Start is called before the first frame update
    void Start()
    {
        agent = GetComponent<NavMeshAgent>();
        agent.stoppingDistance = attackDistance;
        agent.speed = movementSpeed;

        //Set Rigidbody to Kinematic to prevent hit register bug
        if (GetComponent<Rigidbody>())
        {
            GetComponent<Rigidbody>().isKinematic = true;
        }
    }

    // Update is called once per frame
    void Update()
    {
        if (agent.remainingDistance - attackDistance < 0.01f)
        {
            if(Time.time > nextAttackTime)
            {
                nextAttackTime = Time.time + attackRate;

                //Attack
                RaycastHit hit;
                if(Physics.Raycast(firePoint.position, firePoint.forward, out hit, attackDistance))
                {
                    if (hit.transform.CompareTag("Player"))
                    {
                        Debug.DrawLine(firePoint.position, firePoint.position + firePoint.forward * attackDistance, Color.cyan);

                        IEntity player = hit.transform.GetComponent<IEntity>();
                        player.ApplyDamage(npcDamage);
                    }
                }
            }
        }
        //Move towardst he player
        agent.destination = playerTransform.position;
        //Always look at player
        transform.LookAt(new Vector3(playerTransform.transform.position.x, transform.position.y, playerTransform.position.z));
    }

    public void ApplyDamage(float points)
    {
        npcHP -= points;
        if(npcHP <= 0)
        {
            //Destroy the NPC
            GameObject npcDead = Instantiate(npcDeadPrefab, transform.position, transform.rotation);
            //Slightly bounce the npc dead prefab up
            npcDead.GetComponent<Rigidbody>().velocity = (-(playerTransform.position - transform.position).normalized * 8) + new Vector3(0, 5, 0);
            Destroy(npcDead, 10);
            es.EnemyEliminated(this);
            Destroy(gameObject);
        }
    }
}- 新しいスクリプトを作成し、"SC_EnemySpawner" という名前を付けて、その中に以下のコードを貼り付けます。
SC_EnemySpawner.cs
using UnityEngine;
using UnityEngine.SceneManagement;
public class SC_EnemySpawner : MonoBehaviour
{
public GameObject enemyPrefab;
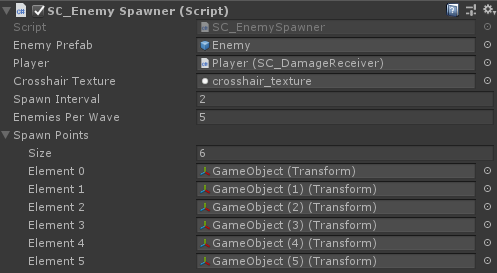
public SC_DamageReceiver player;
public Texture crosshairTexture;
public float spawnInterval = 2; //Spawn new enemy each n seconds
public int enemiesPerWave = 5; //How many enemies per wave
public Transform[] spawnPoints;
float nextSpawnTime = 0;
int waveNumber = 1;
bool waitingForWave = true;
float newWaveTimer = 0;
int enemiesToEliminate;
//How many enemies we already eliminated in the current wave
int enemiesEliminated = 0;
int totalEnemiesSpawned = 0;
// Start is called before the first frame update
void Start()
{
//Lock cursor
Cursor.lockState = CursorLockMode.Locked;
Cursor.visible = false;
//Wait 10 seconds for new wave to start
newWaveTimer = 10;
waitingForWave = true;
}
// Update is called once per frame
void Update()
{
if (waitingForWave)
{
if(newWaveTimer >= 0)
{
newWaveTimer -= Time.deltaTime;
}
else
{
//Initialize new wave
enemiesToEliminate = waveNumber * enemiesPerWave;
enemiesEliminated = 0;
totalEnemiesSpawned = 0;
waitingForWave = false;
}
}
else
{
if(Time.time > nextSpawnTime)
{
nextSpawnTime = Time.time + spawnInterval;
//Spawn enemy
if(totalEnemiesSpawned < enemiesToEliminate)
{
Transform randomPoint = spawnPoints[Random.Range(0, spawnPoints.Length - 1)];
GameObject enemy = Instantiate(enemyPrefab, randomPoint.position, Quaternion.identity);
SC_NPCEnemy npc = enemy.GetComponent<SC_NPCEnemy>();
npc.playerTransform = player.transform;
npc.es = this;
totalEnemiesSpawned++;
}
}
}
if (player.playerHP <= 0)
{
if (Input.GetKeyDown(KeyCode.Space))
{
Scene scene = SceneManager.GetActiveScene();
SceneManager.LoadScene(scene.name);
}
}
}
void OnGUI()
{
GUI.Box(new Rect(10, Screen.height - 35, 100, 25), ((int)player.playerHP).ToString() + " HP");
GUI.Box(new Rect(Screen.width / 2 - 35, Screen.height - 35, 70, 25), player.weaponManager.selectedWeapon.bulletsPerMagazine.ToString());
if(player.playerHP <= 0)
{
GUI.Box(new Rect(Screen.width / 2 - 85, Screen.height / 2 - 20, 170, 40), "Game Over\n(Press 'Space' to Restart)");
}
else
{
GUI.DrawTexture(new Rect(Screen.width / 2 - 3, Screen.height / 2 - 3, 6, 6), crosshairTexture);
}
GUI.Box(new Rect(Screen.width / 2 - 50, 10, 100, 25), (enemiesToEliminate - enemiesEliminated).ToString());
if (waitingForWave)
{
GUI.Box(new Rect(Screen.width / 2 - 125, Screen.height / 4 - 12, 250, 25), "Waiting for Wave " + waveNumber.ToString() + " (" + ((int)newWaveTimer).ToString() + " seconds left...)");
}
}
public void EnemyEliminated(SC_NPCEnemy enemy)
{
enemiesEliminated++;
if(enemiesToEliminate - enemiesEliminated <= 0)
{
//Start next wave
newWaveTimer = 10;
waitingForWave = true;
waveNumber++;
}
}
}- 新しいスクリプトを作成し、"SC_DamageReceiver" という名前を付けて、その中に以下のコードを貼り付けます。
SC_DamageReceiver.cs
using UnityEngine;

public class SC_DamageReceiver : MonoBehaviour, IEntity
{
    //This script will keep track of player HP
    public float playerHP = 100;
    public SC_CharacterController playerController;
    public SC_WeaponManager weaponManager;

    public void ApplyDamage(float points)
    {
        playerHP -= points;

        if(playerHP <= 0)
        {
            //Player is dead
            playerController.canMove = false;
            playerHP = 0;
        }
    }
}- SC_NPCEnemy スクリプトを生きている敵のインスタンスにアタッチします (NavMesh をナビゲートするために必要な、NavMesh Agent と呼ばれる別のコンポーネントが追加されていることがわかります)
- 最近作成したデッド インスタンス プレハブを Npc Dead Prefab 変数に割り当てます。
- Fire Point の場合は、新しいゲームオブジェクトを作成し、生きている敵のインスタンス内に移動して、インスタンスの少し前に配置してから、Fire Point 変数に割り当てます。

- 最後に、生きているインスタンスを Prefab に保存し、Scene から削除します。
敵スポナーの設定
次に、SC_EnemySpawner に移動しましょう。このスクリプトは、ウェーブで敵をスポーンし、プレイヤーの HP、現在の弾薬、現在のウェーブに残っている敵の数などの UI 情報を画面上に表示します。
- 新しいゲームオブジェクトを作成し、名前を付けます "_EnemySpawner"
- SC_EnemySpawner スクリプトをそれにアタッチします
- 新しく作成した敵 AI を Enemy Prefab 変数に割り当てます
- 以下のテクスチャを Crosshair Texture 変数に割り当てます
- いくつかの新しいゲームオブジェクトを作成し、シーンの周囲に配置して、スポーン ポイント配列に割り当てます。
最後に割り当てる変数が 1 つ残っており、それが Player 変数であることがわかります。
- SC_DamageReceiver スクリプトを Player インスタンスにアタッチします
- Player インスタンス タグを次のように変更します。 "Player"
- SC_DamageReceiver でプレーヤー コントローラーと武器マネージャーの変数を割り当てる
- SC_EnemySpawner の Player 変数に Player インスタンスを割り当てる
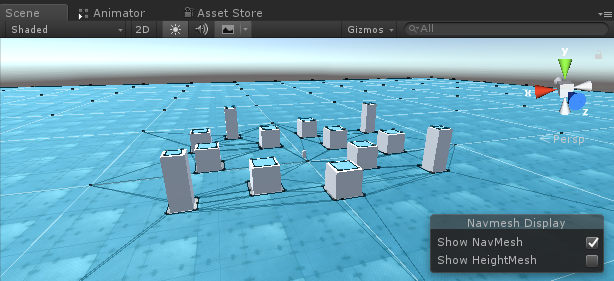
最後に、敵の AI がナビゲートできるように、シーンで NavMesh をベイクする必要があります。
また、NavMesh をベイクする前に、シーン内のすべての静的オブジェクトをナビゲーション静的としてマークすることを忘れないでください。

- NavMesh ウィンドウ ([ウィンドウ] -> [AI] -> [ナビゲーション]) に移動し、[ベイク] タブをクリックして、[ベイク] ボタンをクリックします。NavMesh がベイクされると、次のようになります。
さあ、Play を押してテストしてみましょう。
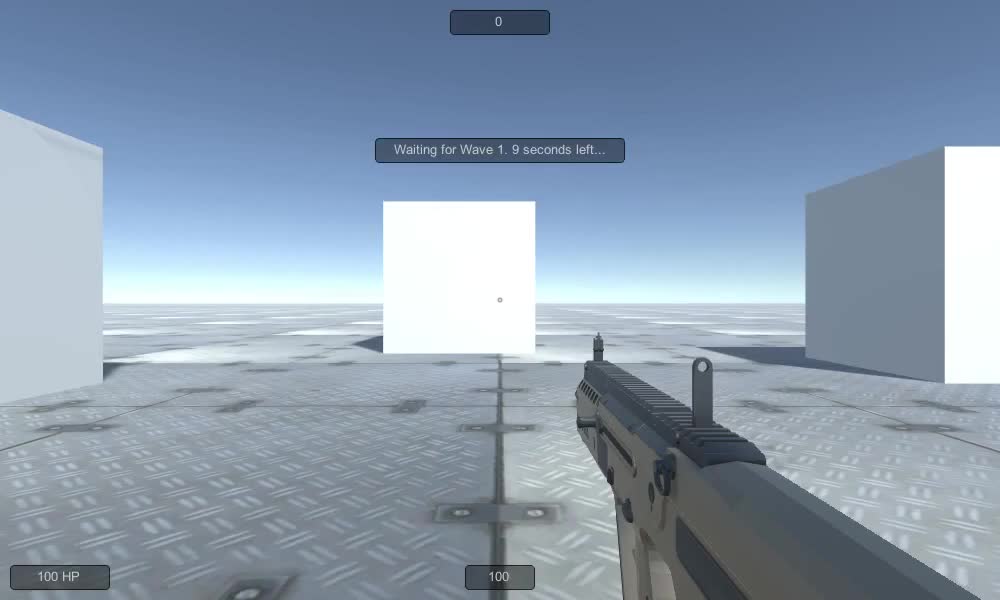
すべてが期待どおりに機能します。