PUN 2 を使用して Unity でマルチプレイヤー ゲームを作成する
Unity 内でマルチプレイヤー ゲームを作成するには何が必要か考えたことはありますか?
シングルプレイヤー ゲームとは異なり、マルチプレイヤー ゲームには、ゲーム クライアントが相互に通信できるようにするブリッジの役割を果たすリモート サーバーが必要です。
現在、数多くのサービスがサーバーのホスティングを行っています。そのようなサービスの 1 つが Photon Network で、このチュートリアルではこれを使用します。
PUN 2 は、従来のバージョンと比較して大幅に改善された API の最新リリースです。
この投稿では、必要なファイルのダウンロード、Photon AppID のセットアップ、簡単なマルチプレイヤーのサンプルのプログラミングまでを実行します。
Unity このチュートリアルで使用されるバージョン: Unity 2018.3.0f2 (64 ビット)
パート 1: PUN 2 のセットアップ
最初のステップは、Asset Store から PUN 2 パッケージをダウンロードすることです。これには、マルチプレイヤーの統合に必要なすべてのスクリプトとファイルが含まれています。
- Unity プロジェクトを開き、Asset Store に移動します: (ウィンドウ -> 一般 -> アセットストア) または Ctrl+9 を押します。
- 「PUN 2- Free」を検索し、最初の結果をクリックするか、ここをクリックしてください
- ダウンロードが完了したら、PUN 2 パッケージをインポートします。
![]()

- パッケージをインポートした後、Photon App ID を作成する必要があります。これは Web サイト (https://www.photonengine.com/) で行われます。
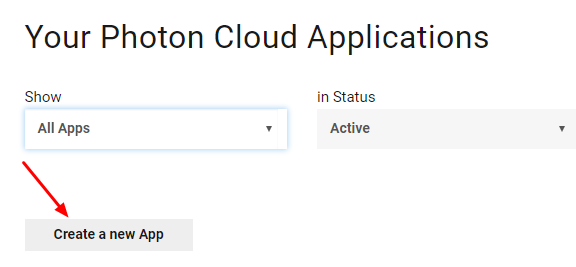
- 新しいアカウントを作成します (または既存のアカウントにログインします)
- プロフィール アイコンをクリックして [アプリケーション] ページに移動し、"Your Applications" をクリックするか、次のリンクをクリックします: https://dashboard.photonengine.com/en-US/PublicCloud
- 「アプリケーション」ページで、 をクリックします。 "Create new app"
- 作成ページで、Photon Type に "Photon Realtime" を選択し、Name に任意の名前を入力して、 "Create"
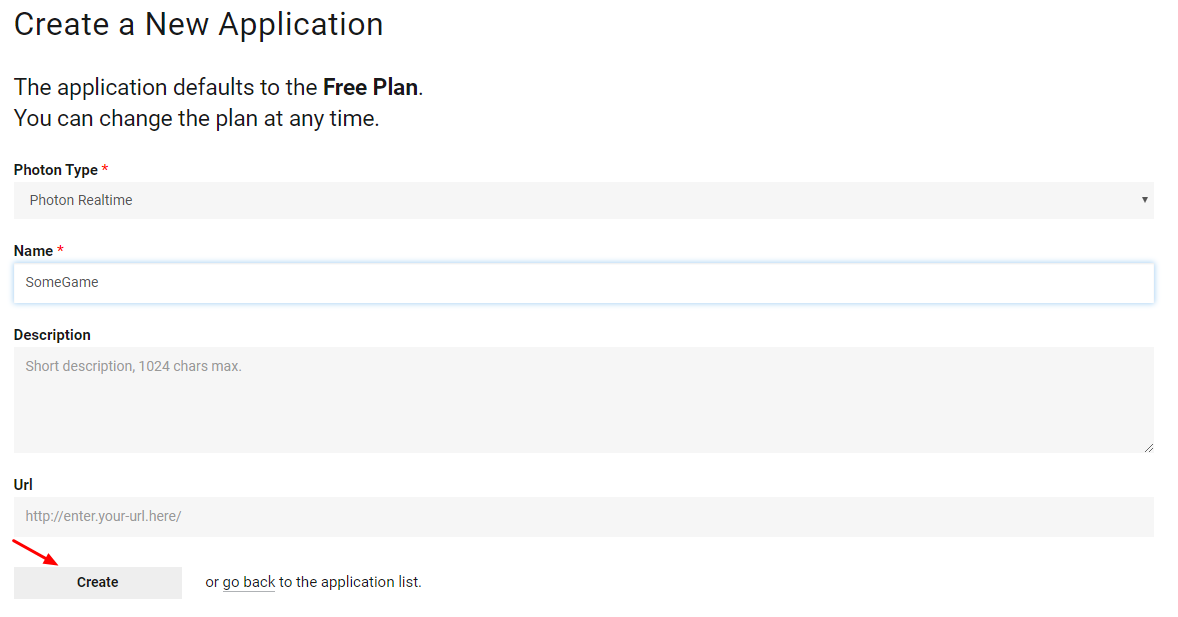
ご覧のとおり、アプリケーションはデフォルトで無料プランに設定されています。料金プラン の詳細については、こちらをご覧ください。
- アプリケーションが作成されたら、アプリ名の下にあるアプリ ID をコピーします。

- Unity プロジェクトに戻り、[ウィンドウ] -> [Photon Unity ネットワーク] -> [PUN ウィザード] に移動します。
- PUN ウィザードで "Setup Project" をクリックし、アプリ ID を貼り付けて、 "Setup Project"
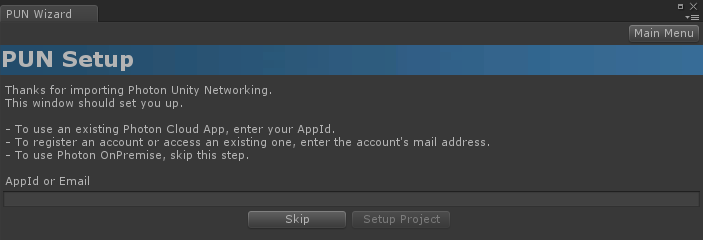
- PUN 2 の準備が整いました。
パート 2: マルチプレイヤー ゲームの作成
それでは、実際にマルチプレイヤー ゲームを作成する部分に移りましょう。
PUN 2 でのマルチプレイヤーの処理方法は次のとおりです。
- まず、ロビーとも呼ばれる Photon リージョン (例: 米国東部、ヨーロッパ、アジアなど) に接続します。
- ロビーに入ると、その地域で作成されたすべてのルームをリクエストし、いずれかのルームに参加するか、独自のルームを作成することができます。
- ルームに参加した後、ルームに接続されているプレーヤーのリストをリクエストし、プレーヤー インスタンスをインスタンス化します。その後、PhotonView を通じてローカル インスタンスと同期されます。
- 誰かがルームを離れると、そのインスタンスは破壊され、プレイヤー リストから削除されます。
1. ロビーのセットアップ
まず、ロビー ロジック (既存のルームの参照、新しいルームの作成など) を含むロビー シーンを作成します。
- 新しい C# スクリプトを作成し、PUN2_GameLobby という名前を付けます。
- 新しいシーンを作成して呼び出します "GameLobby"
- GameLobby シーンで新しい GameObject を作成します。これを "_GameLobby" と名付け、PUN2_GameLobby スクリプトを割り当てます。
次に、PUN2_GameLobby スクリプトを開きます。
まず、スクリプトの先頭に以下の行を追加して、Photon 名前空間をインポートします。
using Photon.Pun;
using Photon.Realtime;
また、続行する前に、デフォルトの MonoBehaviour を MonoBehaviourPunCallbacks に置き換える必要があります。この手順は、Photon コールバックを使用できるようにするために必要です。
public class PUN2_GameLobby : MonoBehaviourPunCallbacks次に、必要な変数を作成します。
    //Our player name
    string playerName = "Player 1";
    //Users are separated from each other by gameversion (which allows you to make breaking changes).
    string gameVersion = "0.9";
    //The list of created rooms
    List<RoomInfo> createdRooms = new List<RoomInfo>();
    //Use this name when creating a Room
    string roomName = "Room 1";
    Vector2 roomListScroll = Vector2.zero;
    bool joiningRoom = false;
次に、void Start() で ConnectUsingSettings() を呼び出します。これは、ゲームが開くとすぐに Photon Server に接続することを意味します。
    // Use this for initialization
    void Start()
    {
        //This makes sure we can use PhotonNetwork.LoadLevel() on the master client and all clients in the same room sync their level automatically
        PhotonNetwork.AutomaticallySyncScene = true;

        if (!PhotonNetwork.IsConnected)
        {
            //Set the App version before connecting
            PhotonNetwork.PhotonServerSettings.AppSettings.AppVersion = gameVersion;
            // Connect to the photon master-server. We use the settings saved in PhotonServerSettings (a .asset file in this project)
            PhotonNetwork.ConnectUsingSettings();
        }
    }
Photon への接続が成功したかどうかを確認するには、次のコールバックを実装する必要があります: OnDisconnected(DisconnectCause Cause)、OnConnectedToMaster()、OnRoomListUpdate(List<RoomInfo> roomList)
public override void OnDisconnected(DisconnectCause cause)
{
Debug.Log("OnFailedToConnectToPhoton. StatusCode: " + cause.ToString() + " ServerAddress: " + PhotonNetwork.ServerAddress);
}
public override void OnConnectedToMaster()
{
Debug.Log("OnConnectedToMaster");
//After we connected to Master server, join the Lobby
PhotonNetwork.JoinLobby(TypedLobby.Default);
}
public override void OnRoomListUpdate(List<RoomInfo> roomList)
{
Debug.Log("We have received the Room list");
//After this callback, update the room list
createdRooms = roomList;
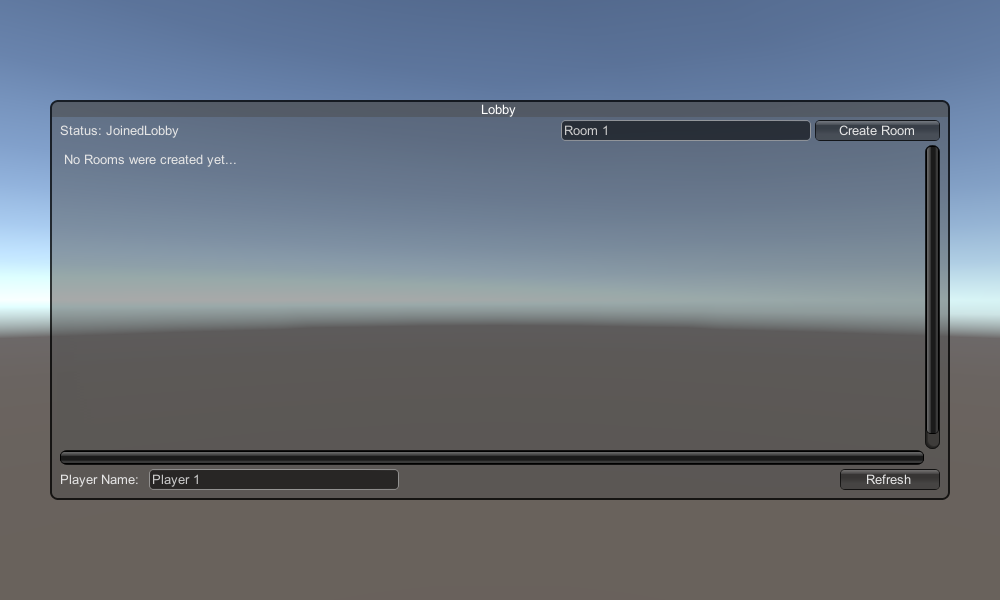
}次は UI 部分で、ルームの参照とルームの作成が行われます。
    void OnGUI()
    {
        GUI.Window(0, new Rect(Screen.width / 2 - 450, Screen.height / 2 - 200, 900, 400), LobbyWindow, "Lobby");
    }

    void LobbyWindow(int index)
    {
        //Connection Status and Room creation Button
        GUILayout.BeginHorizontal();

        GUILayout.Label("Status: " + PhotonNetwork.NetworkClientState);

        if (joiningRoom || !PhotonNetwork.IsConnected || PhotonNetwork.NetworkClientState != ClientState.JoinedLobby)
        {
            GUI.enabled = false;
        }

        GUILayout.FlexibleSpace();

        //Room name text field
        roomName = GUILayout.TextField(roomName, GUILayout.Width(250));

        if (GUILayout.Button("Create Room", GUILayout.Width(125)))
        {
            if (roomName != "")
            {
                joiningRoom = true;

                RoomOptions roomOptions = new RoomOptions();
                roomOptions.IsOpen = true;
                roomOptions.IsVisible = true;
                roomOptions.MaxPlayers = (byte)10; //Set any number

                PhotonNetwork.JoinOrCreateRoom(roomName, roomOptions, TypedLobby.Default);
            }
        }

        GUILayout.EndHorizontal();

        //Scroll through available rooms
        roomListScroll = GUILayout.BeginScrollView(roomListScroll, true, true);

        if (createdRooms.Count == 0)
        {
            GUILayout.Label("No Rooms were created yet...");
        }
        else
        {
            for (int i = 0; i < createdRooms.Count; i++)
            {
                GUILayout.BeginHorizontal("box");
                GUILayout.Label(createdRooms[i].Name, GUILayout.Width(400));
                GUILayout.Label(createdRooms[i].PlayerCount + "/" + createdRooms[i].MaxPlayers);

                GUILayout.FlexibleSpace();

                if (GUILayout.Button("Join Room"))
                {
                    joiningRoom = true;

                    //Set our Player name
                    PhotonNetwork.NickName = playerName;

                    //Join the Room
                    PhotonNetwork.JoinRoom(createdRooms[i].Name);
                }
                GUILayout.EndHorizontal();
            }
        }

        GUILayout.EndScrollView();

        //Set player name and Refresh Room button
        GUILayout.BeginHorizontal();

        GUILayout.Label("Player Name: ", GUILayout.Width(85));
        //Player name text field
        playerName = GUILayout.TextField(playerName, GUILayout.Width(250));

        GUILayout.FlexibleSpace();

        GUI.enabled = (PhotonNetwork.NetworkClientState == ClientState.JoinedLobby || PhotonNetwork.NetworkClientState == ClientState.Disconnected) && !joiningRoom;
        if (GUILayout.Button("Refresh", GUILayout.Width(100)))
        {
            if (PhotonNetwork.IsConnected)
            {
                //Re-join Lobby to get the latest Room list
                PhotonNetwork.JoinLobby(TypedLobby.Default);
            }
            else
            {
                //We are not connected, estabilish a new connection
                PhotonNetwork.ConnectUsingSettings();
            }
        }

        GUILayout.EndHorizontal();

        if (joiningRoom)
        {
            GUI.enabled = true;
            GUI.Label(new Rect(900 / 2 - 50, 400 / 2 - 10, 100, 20), "Connecting...");
        }
    }
最後に、別の 4 つのコールバックを実装します: OnCreateRoomFailed(short returnCode, string message)、OnJoinRoomFailed(short returnCode, string message)、OnCreatedRoom()、およびOnJoinedRoom()。
これらのコールバックは、ルームに参加/作成したかどうか、または接続中に問題が発生したかどうかを判断するために使用されます。
最終的な PUN2_GameLobby.cs スクリプトは次のとおりです。
using System.Collections.Generic;
using UnityEngine;
using Photon.Pun;
using Photon.Realtime;
public class PUN2_GameLobby : MonoBehaviourPunCallbacks
{
//Our player name
string playerName = "Player 1";
//Users are separated from each other by gameversion (which allows you to make breaking changes).
string gameVersion = "0.9";
//The list of created rooms
List<RoomInfo> createdRooms = new List<RoomInfo>();
//Use this name when creating a Room
string roomName = "Room 1";
Vector2 roomListScroll = Vector2.zero;
bool joiningRoom = false;
// Use this for initialization
void Start()
{
//This makes sure we can use PhotonNetwork.LoadLevel() on the master client and all clients in the same room sync their level automatically
PhotonNetwork.AutomaticallySyncScene = true;
if (!PhotonNetwork.IsConnected)
{
//Set the App version before connecting
PhotonNetwork.PhotonServerSettings.AppSettings.AppVersion = gameVersion;
// Connect to the photon master-server. We use the settings saved in PhotonServerSettings (a .asset file in this project)
PhotonNetwork.ConnectUsingSettings();
}
}
public override void OnDisconnected(DisconnectCause cause)
{
Debug.Log("OnFailedToConnectToPhoton. StatusCode: " + cause.ToString() + " ServerAddress: " + PhotonNetwork.ServerAddress);
}
public override void OnConnectedToMaster()
{
Debug.Log("OnConnectedToMaster");
//After we connected to Master server, join the Lobby
PhotonNetwork.JoinLobby(TypedLobby.Default);
}
public override void OnRoomListUpdate(List<RoomInfo> roomList)
{
Debug.Log("We have received the Room list");
//After this callback, update the room list
createdRooms = roomList;
}
void OnGUI()
{
GUI.Window(0, new Rect(Screen.width / 2 - 450, Screen.height / 2 - 200, 900, 400), LobbyWindow, "Lobby");
}
void LobbyWindow(int index)
{
//Connection Status and Room creation Button
GUILayout.BeginHorizontal();
GUILayout.Label("Status: " + PhotonNetwork.NetworkClientState);
if (joiningRoom || !PhotonNetwork.IsConnected || PhotonNetwork.NetworkClientState != ClientState.JoinedLobby)
{
GUI.enabled = false;
}
GUILayout.FlexibleSpace();
//Room name text field
roomName = GUILayout.TextField(roomName, GUILayout.Width(250));
if (GUILayout.Button("Create Room", GUILayout.Width(125)))
{
if (roomName != "")
{
joiningRoom = true;
RoomOptions roomOptions = new RoomOptions();
roomOptions.IsOpen = true;
roomOptions.IsVisible = true;
roomOptions.MaxPlayers = (byte)10; //Set any number
PhotonNetwork.JoinOrCreateRoom(roomName, roomOptions, TypedLobby.Default);
}
}
GUILayout.EndHorizontal();
//Scroll through available rooms
roomListScroll = GUILayout.BeginScrollView(roomListScroll, true, true);
if (createdRooms.Count == 0)
{
GUILayout.Label("No Rooms were created yet...");
}
else
{
for (int i = 0; i < createdRooms.Count; i++)
{
GUILayout.BeginHorizontal("box");
GUILayout.Label(createdRooms[i].Name, GUILayout.Width(400));
GUILayout.Label(createdRooms[i].PlayerCount + "/" + createdRooms[i].MaxPlayers);
GUILayout.FlexibleSpace();
if (GUILayout.Button("Join Room"))
{
joiningRoom = true;
//Set our Player name
PhotonNetwork.NickName = playerName;
//Join the Room
PhotonNetwork.JoinRoom(createdRooms[i].Name);
}
GUILayout.EndHorizontal();
}
}
GUILayout.EndScrollView();
//Set player name and Refresh Room button
GUILayout.BeginHorizontal();
GUILayout.Label("Player Name: ", GUILayout.Width(85));
//Player name text field
playerName = GUILayout.TextField(playerName, GUILayout.Width(250));
GUILayout.FlexibleSpace();
GUI.enabled = (PhotonNetwork.NetworkClientState == ClientState.JoinedLobby || PhotonNetwork.NetworkClientState == ClientState.Disconnected) && !joiningRoom;
if (GUILayout.Button("Refresh", GUILayout.Width(100)))
{
if (PhotonNetwork.IsConnected)
{
//Re-join Lobby to get the latest Room list
PhotonNetwork.JoinLobby(TypedLobby.Default);
}
else
{
//We are not connected, estabilish a new connection
PhotonNetwork.ConnectUsingSettings();
}
}
GUILayout.EndHorizontal();
if (joiningRoom)
{
GUI.enabled = true;
GUI.Label(new Rect(900 / 2 - 50, 400 / 2 - 10, 100, 20), "Connecting...");
}
}
public override void OnCreateRoomFailed(short returnCode, string message)
{
Debug.Log("OnCreateRoomFailed got called. This can happen if the room exists (even if not visible). Try another room name.");
joiningRoom = false;
}
public override void OnJoinRoomFailed(short returnCode, string message)
{
Debug.Log("OnJoinRoomFailed got called. This can happen if the room is not existing or full or closed.");
joiningRoom = false;
}
public override void OnJoinRandomFailed(short returnCode, string message)
{
Debug.Log("OnJoinRandomFailed got called. This can happen if the room is not existing or full or closed.");
joiningRoom = false;
}
public override void OnCreatedRoom()
{
Debug.Log("OnCreatedRoom");
//Set our player name
PhotonNetwork.NickName = playerName;
//Load the Scene called GameLevel (Make sure it's added to build settings)
PhotonNetwork.LoadLevel("GameLevel");
}
public override void OnJoinedRoom()
{
Debug.Log("OnJoinedRoom");
}
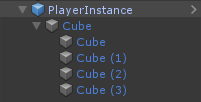
}2. Player プレハブの作成
マルチプレイヤー ゲームでは、プレイヤー インスタンスにはローカルとリモートの 2 つの側面があります。
ローカル インスタンスはローカルで (弊社によって) 制御されます。
一方、リモート インスタンスは、他のプレイヤーが行っていることをローカルに表現したものです。私たちの入力の影響を受けてはいけません。
インスタンスがローカルかリモートかを判断するには、PhotonView コンポーネントを使用します。
PhotonView は、位置や回転など、同期する必要がある値を送受信するメッセンジャーとして機能します。
それでは、プレーヤー インスタンスを作成することから始めましょう (プレーヤー インスタンスをすでに準備している場合は、この手順をスキップできます)。
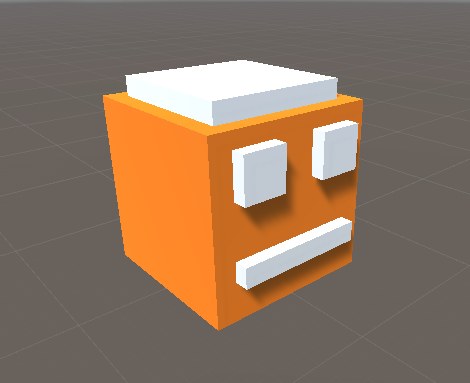
私の場合、Player インスタンスは、W キーと S キーで移動し、A キーと D キーで回転する単純な Cube になります。
簡単なコントローラー スクリプトを次に示します。
SimplePlayerController.cs
using UnityEngine;

public class SimplePlayerController : MonoBehaviour
{

    // Update is called once per frame
    void Update()
    {
        //Move Front/Back
        if (Input.GetKey(KeyCode.W))
        {
            transform.Translate(transform.forward * Time.deltaTime * 2.45f, Space.World);
        }
        else if (Input.GetKey(KeyCode.S))
        {
            transform.Translate(-transform.forward * Time.deltaTime * 2.45f, Space.World);
        }

        //Rotate Left/Right
        if (Input.GetKey(KeyCode.A))
        {
            transform.Rotate(new Vector3(0, -14, 0) * Time.deltaTime * 4.5f, Space.Self);
        }
        else if (Input.GetKey(KeyCode.D))
        {
            transform.Rotate(new Vector3(0, 14, 0) * Time.deltaTime * 4.5f, Space.Self);
        }
    }
}
次のステップは、PhotonView コンポーネントを追加することです。
- PhotonView コンポーネントをプレーヤー インスタンスに追加します。
- 新しい C# スクリプトを作成し、PUN2_PlayerSync という名前を付けます (このスクリプトは PhotonView を介した通信に使用されます)。
PUN2_PlayerSync スクリプトを開きます。
PUN2_PlayerSync で最初に行う必要があるのは、Photon.Pun 名前空間を追加し、MonoBehaviour を MonoBehaviourPun に置き換え、IPunObservable インターフェイスも追加することです。
GetComponent<PhotonView>() を使用する代わりに、キャッシュされた photonView 変数を使用できるようにするには、MonoBehaviourPun が必要です。
using UnityEngine;
using Photon.Pun;

public class PUN2_PlayerSync : MonoBehaviourPun, IPunObservable
その後、必要な変数をすべて作成します。
    //List of the scripts that should only be active for the local player (ex. PlayerController, MouseLook etc.)
    public MonoBehaviour[] localScripts;
    //List of the GameObjects that should only be active for the local player (ex. Camera, AudioListener etc.)
    public GameObject[] localObjects;
    //Values that will be synced over network
    Vector3 latestPos;
    Quaternion latestRot;
次に、void Start() で、photonView.IsMine を使用してプレーヤーがローカルかリモートかを確認します。
    // Use this for initialization
    void Start()
    {
        if (photonView.IsMine)
        {
            //Player is local
        }
        else
        {
            //Player is Remote, deactivate the scripts and object that should only be enabled for the local player
            for (int i = 0; i < localScripts.Length; i++)
            {
                localScripts[i].enabled = false;
            }
            for (int i = 0; i < localObjects.Length; i++)
            {
                localObjects[i].SetActive(false);
            }
        }
    }
実際の同期は、PhotonView のコールバック: OnPhotonSerializeView(PhotonStream stream, PhotonMessageInfo info): を通じて行われます。
    public void OnPhotonSerializeView(PhotonStream stream, PhotonMessageInfo info)
    {
        if (stream.IsWriting)
        {
            //We own this player: send the others our data
            stream.SendNext(transform.position);
            stream.SendNext(transform.rotation);
        }
        else
        {
            //Network player, receive data
            latestPos = (Vector3)stream.ReceiveNext();
            latestRot = (Quaternion)stream.ReceiveNext();
        }
    }
この場合、プレーヤーの位置と回転のみを送信しますが、上記の例を使用して、ネットワーク上で同期する必要がある値を高頻度で送信できます。
受け取った値は void Update() で適用されます。
    // Update is called once per frame
    void Update()
    {
        if (!photonView.IsMine)
        {
            //Update remote player (smooth this, this looks good, at the cost of some accuracy)
            transform.position = Vector3.Lerp(transform.position, latestPos, Time.deltaTime * 5);
            transform.rotation = Quaternion.Lerp(transform.rotation, latestRot, Time.deltaTime * 5);
        }
    }
}
最終的な PUN2_PlayerSync.cs スクリプトは次のとおりです。
using UnityEngine;
using Photon.Pun;

public class PUN2_PlayerSync : MonoBehaviourPun, IPunObservable
{

    //List of the scripts that should only be active for the local player (ex. PlayerController, MouseLook etc.)
    public MonoBehaviour[] localScripts;
    //List of the GameObjects that should only be active for the local player (ex. Camera, AudioListener etc.)
    public GameObject[] localObjects;
    //Values that will be synced over network
    Vector3 latestPos;
    Quaternion latestRot;

    // Use this for initialization
    void Start()
    {
        if (photonView.IsMine)
        {
            //Player is local
        }
        else
        {
            //Player is Remote, deactivate the scripts and object that should only be enabled for the local player
            for (int i = 0; i < localScripts.Length; i++)
            {
                localScripts[i].enabled = false;
            }
            for (int i = 0; i < localObjects.Length; i++)
            {
                localObjects[i].SetActive(false);
            }
        }
    }

    public void OnPhotonSerializeView(PhotonStream stream, PhotonMessageInfo info)
    {
        if (stream.IsWriting)
        {
            //We own this player: send the others our data
            stream.SendNext(transform.position);
            stream.SendNext(transform.rotation);
        }
        else
        {
            //Network player, receive data
            latestPos = (Vector3)stream.ReceiveNext();
            latestRot = (Quaternion)stream.ReceiveNext();
        }
    }

    // Update is called once per frame
    void Update()
    {
        if (!photonView.IsMine)
        {
            //Update remote player (smooth this, this looks good, at the cost of some accuracy)
            transform.position = Vector3.Lerp(transform.position, latestPos, Time.deltaTime * 5);
            transform.rotation = Quaternion.Lerp(transform.rotation, latestRot, Time.deltaTime * 5);
        }
    }
}
次に、新しく作成したスクリプトを割り当てましょう。
- PUN2_PlayerSync スクリプトを PlayerInstance にアタッチします。
- PUN2_PlayerSync を PhotonView の監視コンポーネントにドラッグ アンド ドロップします。
- SimplePlayerController を "Local Scripts" に割り当て、(リモート プレーヤーに対して非アクティブ化したい) ゲームオブジェクトを "Local Objects"
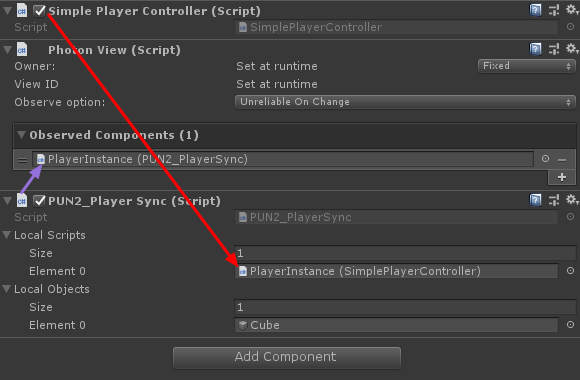
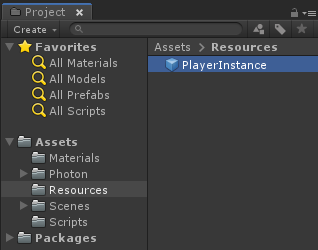
- PlayerInstance を Prefab に保存し、Resources というフォルダーに移動します (そのようなフォルダーがない場合は作成します)。このステップは、ネットワーク上でマルチプレイヤー オブジェクトを生成できるようにするために必要です。
3. ゲームレベルの作成
GameLevel はルームに参加した後に読み込まれるシーンであり、すべてのアクションが発生する場所です。
- 新しいシーンを作成し、"GameLevel" という名前を付けます (または、別の名前を保持したい場合は、PUN2_GameLobby.cs のこの行 PhotonNetwork.LoadLevel("GameLevel"); の名前を必ず変更してください)。
私の場合は、プレーンのある単純なシーンを使用します。
- 次に、新しいスクリプトを作成し、PUN2_RoomController という名前を付けます (このスクリプトは、プレーヤーの生成、プレーヤー リストの表示など、ルーム内のロジックを処理します)。
PUN2_RoomController スクリプトを開きます。
PUN2_GameLobby と同様に、Photon 名前空間を追加し、MonoBehaviour を MonoBehaviourPunCallbacks に置き換えることから始めます。
using UnityEngine;
using Photon.Pun;

public class PUN2_RoomController : MonoBehaviourPunCallbacks
次に、必要な変数を追加しましょう。
    //Player instance prefab, must be located in the Resources folder
    public GameObject playerPrefab;
    //Player spawn point
    public Transform spawnPoint;
Player プレハブをインスタンス化するには、PhotonNetwork.Instantiate を使用します。
    // Use this for initialization
    void Start()
    {
        //In case we started this demo with the wrong scene being active, simply load the menu scene
        if (PhotonNetwork.CurrentRoom == null)
        {
            Debug.Log("Is not in the room, returning back to Lobby");
            UnityEngine.SceneManagement.SceneManager.LoadScene("GameLobby");
            return;
        }

        //We're in a room. spawn a character for the local player. it gets synced by using PhotonNetwork.Instantiate
        PhotonNetwork.Instantiate(playerPrefab.name, spawnPoint.position, Quaternion.identity, 0);
    }
"Leave Room" ボタンと、ルーム名や接続されているプレイヤーのリストなどの追加要素を備えたシンプルな UI:
    void OnGUI()
    {
        if (PhotonNetwork.CurrentRoom == null)
            return;

        //Leave this Room
        if (GUI.Button(new Rect(5, 5, 125, 25), "Leave Room"))
        {
            PhotonNetwork.LeaveRoom();
        }

        //Show the Room name
        GUI.Label(new Rect(135, 5, 200, 25), PhotonNetwork.CurrentRoom.Name);

        //Show the list of the players connected to this Room
        for (int i = 0; i < PhotonNetwork.PlayerList.Length; i++)
        {
            //Show if this player is a Master Client. There can only be one Master Client per Room so use this to define the authoritative logic etc.)
            string isMasterClient = (PhotonNetwork.PlayerList[i].IsMasterClient ? ": MasterClient" : "");
            GUI.Label(new Rect(5, 35 + 30 * i, 200, 25), PhotonNetwork.PlayerList[i].NickName + isMasterClient);
        }
    }
最後に、ルームを出るときに呼び出される OnLeftRoom() という別の PhotonNetwork コールバックを実装します。
    public override void OnLeftRoom()
    {
        //We have left the Room, return back to the GameLobby
        UnityEngine.SceneManagement.SceneManager.LoadScene("GameLobby");
    }
最終的な PUN2_RoomController.cs スクリプトは次のとおりです。
using UnityEngine;
using Photon.Pun;

public class PUN2_RoomController : MonoBehaviourPunCallbacks
{

    //Player instance prefab, must be located in the Resources folder
    public GameObject playerPrefab;
    //Player spawn point
    public Transform spawnPoint;

    // Use this for initialization
    void Start()
    {
        //In case we started this demo with the wrong scene being active, simply load the menu scene
        if (PhotonNetwork.CurrentRoom == null)
        {
            Debug.Log("Is not in the room, returning back to Lobby");
            UnityEngine.SceneManagement.SceneManager.LoadScene("GameLobby");
            return;
        }

        //We're in a room. spawn a character for the local player. it gets synced by using PhotonNetwork.Instantiate
        PhotonNetwork.Instantiate(playerPrefab.name, spawnPoint.position, Quaternion.identity, 0);
    }

    void OnGUI()
    {
        if (PhotonNetwork.CurrentRoom == null)
            return;

        //Leave this Room
        if (GUI.Button(new Rect(5, 5, 125, 25), "Leave Room"))
        {
            PhotonNetwork.LeaveRoom();
        }

        //Show the Room name
        GUI.Label(new Rect(135, 5, 200, 25), PhotonNetwork.CurrentRoom.Name);

        //Show the list of the players connected to this Room
        for (int i = 0; i < PhotonNetwork.PlayerList.Length; i++)
        {
            //Show if this player is a Master Client. There can only be one Master Client per Room so use this to define the authoritative logic etc.)
            string isMasterClient = (PhotonNetwork.PlayerList[i].IsMasterClient ? ": MasterClient" : "");
            GUI.Label(new Rect(5, 35 + 30 * i, 200, 25), PhotonNetwork.PlayerList[i].NickName + isMasterClient);
        }
    }

    public override void OnLeftRoom()
    {
        //We have left the Room, return back to the GameLobby
        UnityEngine.SceneManagement.SceneManager.LoadScene("GameLobby");
    }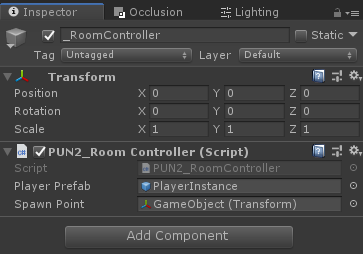
}- 'GameLevel' シーンに新しいゲームオブジェクトを作成し、それを呼び出します "_RoomController"
- PUN2_RoomController スクリプトを _RoomController オブジェクトに添付します
- PlayerInstance プレハブと SpawnPoint Transform をそれに割り当てて、シーンを保存します
- MainMenu と GameLevel の両方をビルド設定に追加します。

4. テストビルドの作成
次に、ビルドを作成してテストします。
すべてが期待どおりに機能します。
ボーナス
RPC
PUN 2 では、RPC は Remote Procedure Call の略で、同じ部屋にあるリモート クライアント上の関数を呼び出すために使用されます (詳細については、こちら を参照してください)。
RPC にはさまざまな用途があります。たとえば、ルーム内のすべてのプレイヤーにチャット メッセージを送信する必要があるとします。RPC を使用すると、これを簡単に行うことができます。
[PunRPC]
void ChatMessage(string senderName, string messageText)
{
    Debug.Log(string.Format("{0}: {1}", senderName, messageText));
}
関数の前の [PunRPC] に注目してください。この属性は、RPC 経由で関数を呼び出す予定の場合に必要です。
RPC としてマークされた関数を呼び出すには、PhotonView が必要です。呼び出しの例:
PhotonView photonView = PhotonView.Get(this);
photonView.RPC("ChatMessage", RpcTarget.All, PhotonNetwork.playerName, "Some message");
プロのヒント: スクリプト内の MonoBehaviour を MonoBehaviourPun または MonoBehaviourPunCallbacks に置き換える場合は、PhotonView.Get() をスキップして photonView.RPC() を直接使用できます。
カスタムプロパティ
PUN 2 では、カスタム プロパティはプレーヤーまたはルームに割り当てることができるハッシュテーブルです。
これは、頻繁に変更する必要のない永続的なデータを設定する必要がある場合に便利です (例: プレーヤーのチーム名、ルーム ゲーム モードなど)。
まず、ハッシュテーブルを定義する必要があります。これは、スクリプトの先頭に以下の行を追加することで行われます。
//Replace default Hashtables with Photon hashtables
using Hashtable = ExitGames.Client.Photon.Hashtable;
以下の例では、"GameMode" および "AnotherProperty" という Room プロパティを設定します。
        //Set Room properties (Only Master Client is allowed to set Room properties)
        if (PhotonNetwork.IsMasterClient)
        {
            Hashtable setRoomProperties = new Hashtable();
            setRoomProperties.Add("GameMode", "FFA");
            setRoomProperties.Add("AnotherProperty", "Test");
            PhotonNetwork.CurrentRoom.SetCustomProperties(setRoomProperties);
        }

        //Will print "FFA"
        print((string)PhotonNetwork.CurrentRoom.CustomProperties["GameMode"]);
        //Will print "Test"
        print((string)PhotonNetwork.CurrentRoom.CustomProperties["AnotherProperty"]);
プレーヤーのプロパティも同様に設定されます。
            Hashtable setPlayerProperties = new Hashtable();
            setPlayerProperties.Add("PlayerHP", (float)100);
            PhotonNetwork.LocalPlayer.SetCustomProperties(setPlayerProperties);

            print((float)PhotonNetwork.LocalPlayer.CustomProperties["PlayerHP"]);
特定のプロパティを削除するには、その値を null に設定するだけです。
            Hashtable setPlayerProperties = new Hashtable();
            setPlayerProperties.Add("PlayerHP", null);
            PhotonNetwork.LocalPlayer.SetCustomProperties(setPlayerProperties);
追加のチュートリアル: