PUN 2 を使用してネットワーク上でリジッドボディを同期する
PUN 2 でオブジェクトを同期するのは簡単ですが、リジッドボディを同期する場合はどうすればよいでしょうか?
通常のゲームオブジェクトとは異なり、Rigidbody は重力 (キネマティックではない場合) や他のオブジェクトの影響も受けます。したがって、オブジェクトの Transform だけを同期するのではなく、velocity や angularVelocity など、いくつかの追加パラメータも同期する必要があります。
この投稿では、ルーム内のすべてのプレーヤーから影響を受け、ネットワーク経由で同期できるインタラクティブなリジッドボディを作成する方法を説明します。
Unity このチュートリアルで使用されるバージョン: Unity 2018.3.0f2 (64 ビット)
パート 1: PUN 2 とマルチプレイヤーの例のセットアップ
PUN 2 を使用してマルチプレイヤーの例をセットアップする方法に関するチュートリアルがすでにあります。以下のリンクを確認してください。
PUN 2 を使用して Unity 3D でマルチプレイヤー ゲームを作成する
マルチプレイヤー プロジェクトのセットアップが完了したら、戻ってください。続行できるようになります。
あるいは、here からソース プロジェクトを取得して時間を節約することもできます。
パート 2: インタラクティブなリジッドボディの追加
上記のチュートリアルに従った場合、2 つのシーン "GameLobby" と "GameLevel"
- "GameLevel" シーンを開き、いくつかのキューブを作成します (ゲームオブジェクト -> 3D オブジェクト -> キューブ)
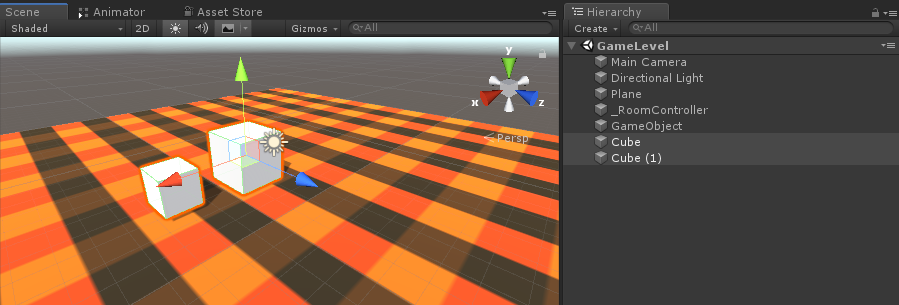
- 各 Cube に Rigidbody コンポーネントを追加します
- PhotonView コンポーネントを各 Cube に追加します
次に、ネットワーク上でリジッドボディを同期する新しいスクリプトを作成する必要があります。
- 新しいスクリプトを作成し、PUN2_RigidbodySync という名前を付けます。
PUN2_RigidbodySync.cs
using UnityEngine;
using Photon.Pun;

public class PUN2_RigidbodySync : MonoBehaviourPun, IPunObservable
{

    Rigidbody r;

    Vector3 latestPos;
    Quaternion latestRot;
    Vector3 velocity;
    Vector3 angularVelocity;

    bool valuesReceived = false;

    // Start is called before the first frame update
    void Start()
    {
        r = GetComponent<Rigidbody>();
    }

    public void OnPhotonSerializeView(PhotonStream stream, PhotonMessageInfo info)
    {
        if (stream.IsWriting)
        {
            //We own this player: send the others our data
            stream.SendNext(transform.position);
            stream.SendNext(transform.rotation);
            stream.SendNext(r.velocity);
            stream.SendNext(r.angularVelocity);
        }
        else
        {
            //Network player, receive data
            latestPos = (Vector3)stream.ReceiveNext();
            latestRot = (Quaternion)stream.ReceiveNext();
            velocity = (Vector3)stream.ReceiveNext();
            angularVelocity = (Vector3)stream.ReceiveNext();

            valuesReceived = true;
        }
    }

    // Update is called once per frame
    void Update()
    {
        if (!photonView.IsMine && valuesReceived)
        {
            //Update Object position and Rigidbody parameters
            transform.position = Vector3.Lerp(transform.position, latestPos, Time.deltaTime * 5);
            transform.rotation = Quaternion.Lerp(transform.rotation, latestRot, Time.deltaTime * 5);
            r.velocity = velocity;
            r.angularVelocity = angularVelocity;
        }
    }

    void OnCollisionEnter(Collision contact)
    {
        if (!photonView.IsMine)
        {
            Transform collisionObjectRoot = contact.transform.root;
            if (collisionObjectRoot.CompareTag("Player"))
            {
                //Transfer PhotonView of Rigidbody to our local player
                photonView.TransferOwnership(PhotonNetwork.LocalPlayer);
            }
        }
    }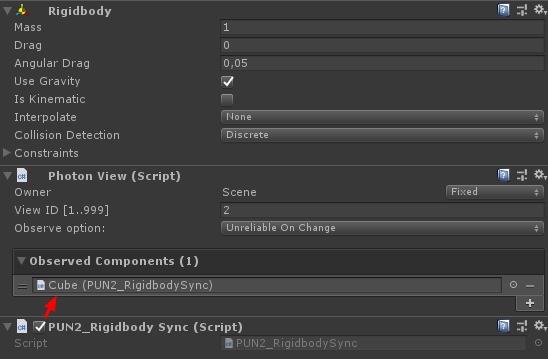
}- PUN2_RigidbodySync を両方の Cube にアタッチし、Photon View "Observed Components" にも割り当てます。
また、マルチプレイヤー チュートリアルの PUN2_PlayerSync スクリプトにいくつかの変更を加える必要があります。
- PUN2_PlayerSync.cs を開く
- void Start() の if(photonView.IsMine) 内に次のコードを追加します。
            //Player is local
            gameObject.tag = "Player";
            //Add Rigidbody to make the player interact with rigidbody
            Rigidbody r = gameObject.AddComponent<Rigidbody>();
            r.isKinematic = true;
したがって、 void Start() は次のようになります。
    // Use this for initialization
    void Start()
    {
        if (photonView.IsMine)
        {
            //Player is local
            gameObject.tag = "Player";
            //Add Rigidbody to make the player interact with rigidbody
            Rigidbody r = gameObject.AddComponent<Rigidbody>();
            r.isKinematic = true;
        }
        else
        {
            //Player is Remote, deactivate the scripts and object that should only be enabled for the local player
            for (int i = 0; i < localScripts.Length; i++)
            {
                localScripts[i].enabled = false;
            }
            for (int i = 0; i < localObjects.Length; i++)
            {
                localObjects[i].SetActive(false);
            }
        }
    }
Rigidbody コンポーネントを追加することで、プレーヤー インスタンスが他の Rigidbody と対話できるようにし、タグを "Player" に変更することで、Rigidbody と衝突したローカル インスタンスかどうかを検出できます。
- すべてが完了したら、GameLevel シーンを保存します。
では、ビルドを作成してテストしてみましょう。
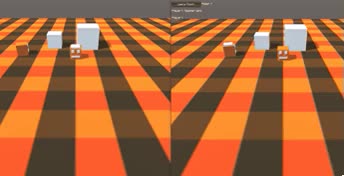
すべてが期待どおりに動作し、対話可能でありながらネットワーク経由でリジッドボディを同期できるようになりました。