Unity の分割画面同一 PC マルチプレイヤー チュートリアル
このチュートリアルでは、Unity で分割画面 マルチプレイヤー を作成する方法を説明します。
ステップ
- レベルでシーンを開きます (私の場合、いくつかのキューブを含む単純なシーンになります)

- 新しいゲームオブジェクトを作成して呼び出します "Player 1"
- 新しい Cube を作成し、"Player 1" オブジェクト内に移動します (Box Collider コンポーネントを削除します)。
- 目と口用にさらにいくつかの Cube を作成します (Box Collider コンポーネントも削除します)。

- メイン カメラを "Player 1" オブジェクト内に移動し、Cube に向けます


- 新しいスクリプト を作成し、 "RigidbodyPlayerController" という名前を付け、その中に以下のコードを貼り付けます。
RigidbodyPlayerController.cs
using UnityEngine;
using System.Collections;

[RequireComponent(typeof(Rigidbody))]
[RequireComponent(typeof(CapsuleCollider))]

public class RigidbodyPlayerController : MonoBehaviour
{

    public enum PlayerControls { WASD, Arrows }
    public PlayerControls playerControls = PlayerControls.WASD;
    public float movementSpeed = 3f;
    public float rotationSpeed = 5f;

    Rigidbody r;
    float gravity = 10.0f;

    void Awake()
    {
        r = GetComponent<Rigidbody>();
        r.freezeRotation = true;
        r.useGravity = false;
    }

    // Update is called once per frame
    void FixedUpdate()
    {
        // Move Front/Back
        Vector3 targetVelocity = Vector3.zero;
        if ((playerControls == PlayerControls.WASD && Input.GetKey(KeyCode.W)) || (playerControls == PlayerControls.Arrows && Input.GetKey(KeyCode.UpArrow)))
        {
            targetVelocity.z = 1;
        }
        else if ((playerControls == PlayerControls.WASD && Input.GetKey(KeyCode.S)) || (playerControls == PlayerControls.Arrows && Input.GetKey(KeyCode.DownArrow)))
        {
            targetVelocity.z = -1;
        }
        targetVelocity = transform.TransformDirection(targetVelocity);
        targetVelocity *= movementSpeed;

        // Apply a force that attempts to reach our target velocity
        Vector3 velocity = r.velocity;
        Vector3 velocityChange = (targetVelocity - velocity);
        float maxVelocityChange = 10.0f;
        velocityChange.x = Mathf.Clamp(velocityChange.x, -maxVelocityChange, maxVelocityChange);
        velocityChange.z = Mathf.Clamp(velocityChange.z, -maxVelocityChange, maxVelocityChange);
        velocityChange.y = 0;
        r.AddForce(velocityChange, ForceMode.VelocityChange);

        // We apply gravity manually for more tuning control
        r.AddForce(new Vector3(0, -gravity * r.mass, 0));


        // Rotate Left/Right
        if ((playerControls == PlayerControls.WASD && Input.GetKey(KeyCode.A)) || (playerControls == PlayerControls.Arrows && Input.GetKey(KeyCode.LeftArrow)))
        {
            transform.Rotate(new Vector3(0, -14, 0) * Time.deltaTime * rotationSpeed, Space.Self);
        }
        else if ((playerControls == PlayerControls.WASD && Input.GetKey(KeyCode.D)) || (playerControls == PlayerControls.Arrows && Input.GetKey(KeyCode.RightArrow)))
        {
            transform.Rotate(new Vector3(0, 14, 0) * Time.deltaTime * rotationSpeed, Space.Self);
        }
    }
}- に RigidbodyPlayerController スクリプトを "Player 1" にアタッチします (さらに 2 つのコンポーネント、Rigidbody と Capsule Collider が追加されることがわかります)
- Cube の寸法と一致するまで Capsule Collider を微調整します。
2 プレイヤー分割画面を作成する手順は次のとおりです。
- "Player 1" オブジェクトを複製し、名前を "Player 2" に変更します。
- RigidbodyPlayerController で、Player Controls を "Arrows" に変更します。

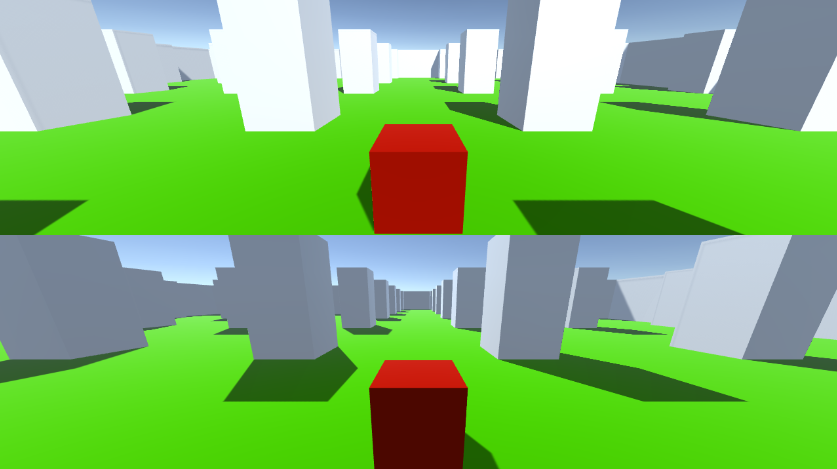
- "Player 1" カメラのビューポートの Rect 値を X: 0 Y: 0.5 W: 1 H: 0.5 に変更します。
![]()
- "Player 2" カメラのビューポートの Rect 値を X: 0 Y: 0 W: 1 H: 0.5 に変更します。
![]()
あるいは、以下の値を設定して垂直分割画面を設定することもできます。
X: 0 Y: 0 W: 0.5 H: 1 (カメラ 1)
X: 0.5 Y: 0 W: 0.5 H: 1 (カメラ 2)
