Unity モバイル タッチ コントロールの作り方
コントロールはビデオ ゲームの最も重要な部分の 1 つであり、プレーヤーがゲームの世界と対話できるようにするものであることは当然のことです。
ゲーム コントロールは、ハードウェア インタラクション (マウス/キーボード、コントローラー、タッチスクリーンなど) を通じて送信される信号であり、その後ゲーム コードによって処理され、特定のアクションが適用されます。
PC および ゲーム コンソール には、押すことができる物理ボタンがありますが、最新のモバイル デバイスには物理ボタンが数個しかなく、残りの操作は タッチ ジェスチャ によって行われます。つまり、ゲームボタンを画面上に表示する必要があります。そのため、モバイル ゲームを作成する場合は、画面上にすべてのボタンを配置しつつ、ユーザーフレンドリーですっきりとした画面にすることとのバランスを見つけることが重要です。

このチュートリアルでは、UI Canvas を使用して Unity でフル機能 (ジョイスティックとボタン) のモバイル コントロールを作成する方法を説明します。
ステップ 1: 必要なスクリプトをすべて作成する
このチュートリアルには、SC_ClickTracker.cs と SC_MobileControls.cs という 2 つのスクリプトが含まれています。最初のスクリプトはクリック イベントをリッスンし、2 番目のスクリプトはイベントから生成された値を読み取ります。
SC_ClickTracker.cs
using System.Collections;
using System.Collections.Generic;
using UnityEngine;
using UnityEngine.EventSystems;

#if UNITY_EDITOR
using UnityEditor;
#endif

public class SC_ClickTracker : MonoBehaviour, IPointerDownHandler, IDragHandler, IPointerUpHandler
{
    public string buttonName = ""; //This should be an unique name of the button
    public bool isJoystick = false;
    public float movementLimit = 1; //How far the joystick can be moved (n x Joystick Width)
    public float movementThreshold = 0.1f; //Minimum distance (n x Joystick Width) that the Joystick need to be moved to trigger inputAxis (Must be less than movementLimit)

    //Reference variables
    RectTransform rt;
    Vector3 startPos;
    Vector2 clickPos;

    //Input variables
    Vector2 inputAxis = Vector2.zero;
    bool holding = false;
    bool clicked = false;

    void Start()
    {
        //Add this button to the list
        SC_MobileControls.instance.AddButton(this);

        rt = GetComponent<RectTransform>();
        startPos = rt.anchoredPosition3D;
    }

    //Do this when the mouse is clicked over the selectable object this script is attached to.
    public void OnPointerDown(PointerEventData eventData)
    {
        //Debug.Log(this.gameObject.name + " Was Clicked.");

        holding = true;

        if (!isJoystick)
        {
            clicked = true;
            StartCoroutine(StopClickEvent());
        }
        else
        {
            //Initialize Joystick movement
            clickPos = eventData.pressPosition;
        }
    }

    WaitForEndOfFrame waitForEndOfFrame = new WaitForEndOfFrame();

    //Wait for next update then release the click event
    IEnumerator StopClickEvent()
    {
        yield return waitForEndOfFrame;

        clicked = false;
    }

    //Joystick movement
    public void OnDrag(PointerEventData eventData)
    {
        //Debug.Log(this.gameObject.name + " The element is being dragged");

        if (isJoystick)
        {
            Vector3 movementVector = Vector3.ClampMagnitude((eventData.position - clickPos) / SC_MobileControls.instance.canvas.scaleFactor, (rt.sizeDelta.x * movementLimit) + (rt.sizeDelta.x * movementThreshold));
            Vector3 movePos = startPos + movementVector;
            rt.anchoredPosition = movePos;

            //Update inputAxis
            float inputX = 0;
            float inputY = 0;
            if (Mathf.Abs(movementVector.x) > rt.sizeDelta.x * movementThreshold)
            {
                inputX = (movementVector.x - (rt.sizeDelta.x * movementThreshold * (movementVector.x > 0 ? 1 : -1))) / (rt.sizeDelta.x * movementLimit);
            }
            if (Mathf.Abs(movementVector.y) > rt.sizeDelta.x * movementThreshold)
            {
                inputY = (movementVector.y - (rt.sizeDelta.x * movementThreshold * (movementVector.y > 0 ? 1 : -1))) / (rt.sizeDelta.x * movementLimit);
            }
            inputAxis = new Vector2(inputX, inputY);
        }
    }

    //Do this when the mouse click on this selectable UI object is released.
    public void OnPointerUp(PointerEventData eventData)
    {
        //Debug.Log(this.gameObject.name + " The mouse click was released");

        holding = false;

        if (isJoystick)
        {
            //Reset Joystick position
            rt.anchoredPosition = startPos;
            inputAxis = Vector2.zero;
        }
    }

    public Vector2 GetInputAxis()
    {
        return inputAxis;
    }

    public bool GetClickedStatus()
    {
        return clicked;
    }

    public bool GetHoldStatus()
    {
        return holding;
    }
}

#if UNITY_EDITOR
//Custom Editor
[CustomEditor(typeof(SC_ClickTracker))]
public class SC_ClickTracker_Editor : Editor
{
    public override void OnInspectorGUI()
    {
        SC_ClickTracker script = (SC_ClickTracker)target;

        script.buttonName = EditorGUILayout.TextField("Button Name", script.buttonName);
        script.isJoystick = EditorGUILayout.Toggle("Is Joystick", script.isJoystick);
        if (script.isJoystick)
        {
            script.movementLimit = EditorGUILayout.FloatField("Movement Limit", script.movementLimit);
            script.movementThreshold = EditorGUILayout.FloatField("Movement Threshold", script.movementThreshold);
        }
    }
}
#endif
SC_MobileControls.cs
using System.Collections;
using System.Collections.Generic;
using UnityEngine;

public class SC_MobileControls : MonoBehaviour
{
    [HideInInspector]
    public Canvas canvas;
    List<SC_ClickTracker> buttons = new List<SC_ClickTracker>();

    public static SC_MobileControls instance;

    void Awake()
    {
        //Assign this script to static variable, so it can be accessed from other scripts. Make sure there is only one SC_MobileControls in the Scene.
        instance = this;

        canvas = GetComponent<Canvas>();
    }

    public int AddButton(SC_ClickTracker button)
    {
        buttons.Add(button);

        return buttons.Count - 1;
    }

    public Vector2 GetJoystick(string joystickName)
    {
        for(int i = 0; i < buttons.Count; i++)
        {
            if(buttons[i].buttonName == joystickName)
            {
                return buttons[i].GetInputAxis();
            }
        }

        Debug.LogError("Joystick with a name '" + joystickName + "' not found. Make sure SC_ClickTracker is assigned to the button and the name is matching.");

        return Vector2.zero;
    }

    public bool GetMobileButton(string buttonName)
    {
        for (int i = 0; i < buttons.Count; i++)
        {
            if (buttons[i].buttonName == buttonName)
            {
                return buttons[i].GetHoldStatus();
            }
        }

        Debug.LogError("Button with a name '" + buttonName + "' not found. Make sure SC_ClickTracker is assigned to the button and the name is matching.");

        return false;
    }

    public bool GetMobileButtonDown(string buttonName)
    {
        for (int i = 0; i < buttons.Count; i++)
        {
            if (buttons[i].buttonName == buttonName)
            {
                return buttons[i].GetClickedStatus();
            }
        }

        Debug.LogError("Button with a name '" + buttonName + "' not found. Make sure SC_ClickTracker is assigned to the button and the name is matching.");

        return false;
    }
}
ステップ 2: モバイル コントロールをセットアップする
- 新しいキャンバスを作成します (ゲームオブジェクト -> UI -> キャンバス)
- Canvas Scaler の 'UI Scale Mode' を 'Scale With Screen Size' に変更し、参照解像度を作業しているものに変更します (私の場合は 1000 x 600)
- SC_MobileControls スクリプトを Canvas オブジェクトにアタッチします
- キャンバス オブジェクトを右クリック -> UI -> 画像
- 新しく作成したイメージの名前を次のように変更します。 "JoystickLeft"
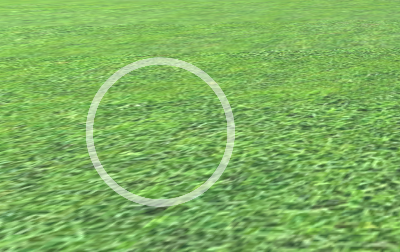
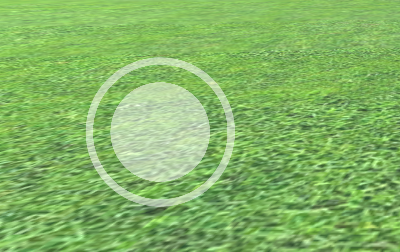
- "JoystickLeft" スプライトを空の円に変更します (Unity にインポートした後、テクスチャ タイプを 'Sprite (2D and UI)' に変更することを忘れないでください)
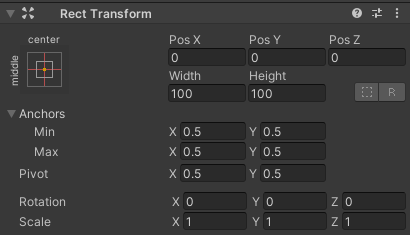
- "JoystickLeft" Rect Transform の値を、以下の スクリーンショット と同じに設定します。
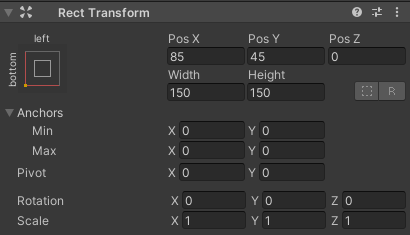
- Image コンポーネントで、Color alpha を 0.5 に設定して、スプライトをわずかに透明にします。
- "JoystickLeft" オブジェクトを複製し、名前を次のように変更します。 "JoystickLeftButton"
- "JoystickLeftButton" を "JoystickLeft" オブジェクト内に移動します
- "JoystickLeftButton" スプライトを黒丸に変更します。
- 以下のスクリーンショットと同じように "JoystickLeftButton" Rect Transform 値を設定します。
- ボタンコンポーネントを追加 "JoystickLeftButton"
- Button コンポーネントで Transition を次のように変更します。 'None'
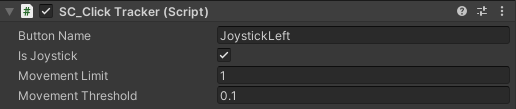
- SC_ClickTracker スクリプトを に添付します "JoystickLeftButton"
- SC_ClickTracker で、ボタン名を任意の一意の名前に設定し (私の場合は 'JoystickLeft' に設定しました)、'Is Joystick' チェックボックスを有効にします。
ジョイスティックボタンの準備が完了しました。ジョイスティックはいくつでも使用できます (私の場合は 2 つあり、左側に 1 つが動きを制御し、もう 1 つが回転を制御します)。
- "JoystickLeft" を複製し、名前を次のように変更します。 "JoystickRight"
- "JoystickRight" を展開し、"JoystickLeftButton" の名前を次のように変更します。 "JoystickRightButton"
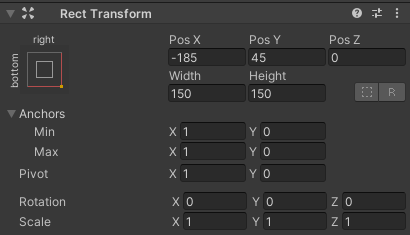
- 以下のスクリーンショットと同じように "JoystickRight" Rect Transform 値を設定します。
- "JoystickRightButton" オブジェクトを選択し、SC_ClickTracker でボタン名を次のように変更します。 'JoystickRight'
2 番目のジョイスティックの準備ができました。
次に、通常のボタンを作成しましょう。
- キャンバス オブジェクトを右クリック -> UI -> ボタン
- ボタンオブジェクトの名前を次のように変更します "SprintButton"
- "SprintButton" スプライトをベベル効果のある円に変更します。

- 以下のスクリーンショットと同じように "SprintButton" Rect Transform 値を設定します。

- "SprintButton" 画像のカラー アルファを 0.5 に変更します。
- SC_ClickTracker スクリプトを "SprintButton" オブジェクトにアタッチします
- SC_ClickTracker で、ボタン名を次のように変更します。 'Sprinting'
- "SprintButton" 内のテキスト オブジェクトを選択し、そのテキストを 'Sprint' に変更し、フォント サイズも に変更します。 'Bold'
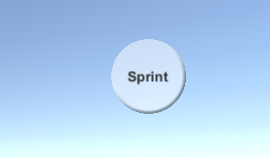
ボタンの準備が完了しました。
"Jump" という名前の別のボタンを作成します。
- "SprintButton" オブジェクトを複製し、名前を次のように変更します。 "JumpButton"
- "JumpButton" Pos Y の値を 250 に変更します
- SC_ClickTracker で、ボタン名を次のように変更します。 'Jumping'
- "JumpButton" 内のテキストを次のように変更します。 'Jump'
最後のボタンは "Action" です。
- "JumpButton" オブジェクトを複製し、名前を次のように変更します。 "ActionButton"
- "ActionButton" Pos X の値を -185 に変更します
- SC_ClickTracker で、ボタン名を次のように変更します。 'Action'
- "ActionButton" 内のテキストを次のように変更します。 'Action'
ステップ 3: モバイル コントロールを実装する
上記の手順に従った場合は、次の関数を使用してスクリプトにモバイル コントロールを実装できるようになります。
if(SC_MobileControls.instance.GetMobileButtonDown("BUTTON_NAME")){
	//Mobile button has been pressed one time, equivalent to if(Input.GetKeyDown(KeyCode...))
}

if(SC_MobileControls.instance.GetMobileButton("BUTTON_NAME")){
	//Mobile button is being held pressed, equivalent to if(Input.GetKey(KeyCode...))
}

//Get normalized direction of a on-screen Joystick
//Could be compared to: new Vector2(Input.GetAxis("Horizontal"), Input.GetAxis("Vertical")) or new Vector2(Input.GetAxis("Mouse X"), Input.GetAxis("Mouse Y"))
Vector2 inputAxis = SC_MobileControls.instance.GetJoystick("JOYSTICK_NAME");例として、このチュートリアル の FPS コントローラーを使用してモバイル コントロールを実装します。まずそのチュートリアルに従ってください。それは非常に簡単です。
このチュートリアルに従った場合は、モバイル コントロールを備えた Canvas とともに "FPSPlayer" オブジェクトが作成されることになります。
デスクトップ コントロールを維持しながらモバイル コントロールも実装し、クロスプラットフォームにします。
- SC_FPSController スクリプトを開き、28 行目までスクロールして、この部分を削除します (この部分を削除すると、カーソルがロックされなくなり、エディターでモバイル コントロールをクリックできるようになります)。
        // Lock cursor
        Cursor.lockState = CursorLockMode.Locked;
Cursor.visible = false;- 39 行目までスクロールし、以下を置き換えます。
        bool isRunning = Input.GetKey(KeyCode.LeftShift);
        float curSpeedX = canMove ? (isRunning ? runningSpeed : walkingSpeed) * Input.GetAxis("Vertical") : 0;
float curSpeedY = canMove ? (isRunning ? runningSpeed : walkingSpeed) * Input.GetAxis("Horizontal") : 0;- と:
        bool isRunning = Input.GetKey(KeyCode.LeftShift) || SC_MobileControls.instance.GetMobileButton("Sprinting");
        float curSpeedX = canMove ? (isRunning ? runningSpeed : walkingSpeed) * (Input.GetAxis("Vertical") + SC_MobileControls.instance.GetJoystick("JoystickLeft").y) : 0;
float curSpeedY = canMove ? (isRunning ? runningSpeed : walkingSpeed) * (Input.GetAxis("Horizontal") + SC_MobileControls.instance.GetJoystick("JoystickLeft").x) : 0;- 45 行目まで下にスクロールし、以下を置き換えます。
if (Input.GetButton("Jump") && canMove && characterController.isGrounded)- と:
if ((Input.GetButton("Jump") || SC_MobileControls.instance.GetMobileButtonDown("Jumping")) && canMove && characterController.isGrounded)- 68 行目まで下にスクロールし、以下を置き換えます。
            rotationX += -Input.GetAxis("Mouse Y") * lookSpeed;
            rotationX = Mathf.Clamp(rotationX, -lookXLimit, lookXLimit);
            playerCamera.transform.localRotation = Quaternion.Euler(rotationX, 0, 0);
transform.rotation *= Quaternion.Euler(0, Input.GetAxis("Mouse X") * lookSpeed, 0);- と:
#if UNITY_IPHONE || UNITY_ANDROID || UNITY_EDITOR
            rotationX += -(SC_MobileControls.instance.GetJoystick("JoystickRight").y) * lookSpeed;
#else
            rotationX += -Input.GetAxis("Mouse Y") * lookSpeed;
#endif
            rotationX = Mathf.Clamp(rotationX, -lookXLimit, lookXLimit);
            playerCamera.transform.localRotation = Quaternion.Euler(rotationX, 0, 0);
#if UNITY_IPHONE || UNITY_ANDROID || UNITY_EDITOR
            transform.rotation *= Quaternion.Euler(0, SC_MobileControls.instance.GetJoystick("JoystickRight").x * lookSpeed, 0);
#else
            transform.rotation *= Quaternion.Euler(0, Input.GetAxis("Mouse X") * lookSpeed, 0);
#endif見た目の動きはエディターでのジョイスティックのテストに干渉するため、プラットフォーム固有のコンパイル に #if を使用して、モバイル ロジックを残りのプラットフォームから分離しています。
モバイル FPS コントローラーの準備ができました。テストしてみましょう。
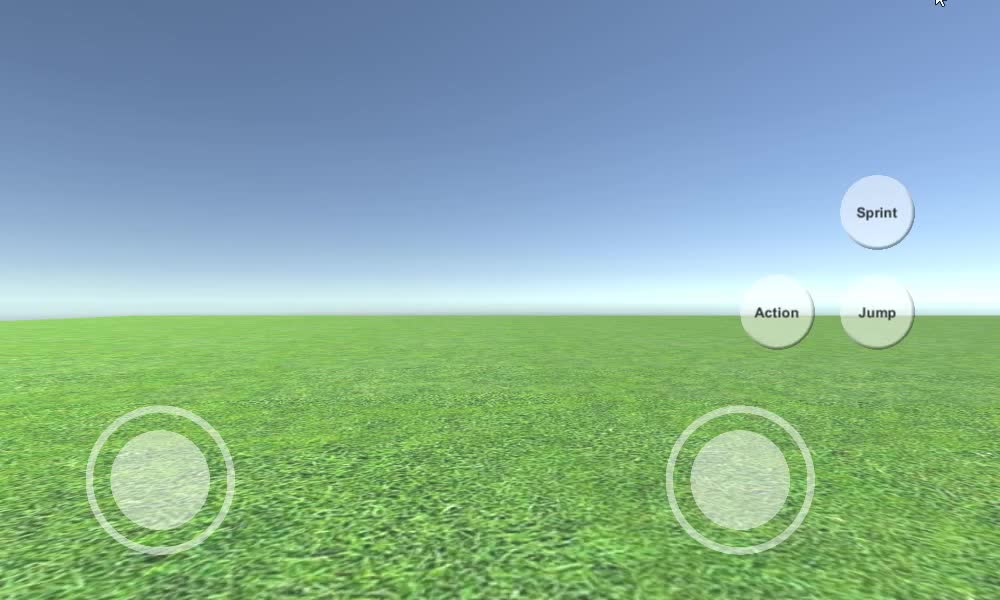
ご覧のとおり、すべてのジョイスティックとボタンは機能します ("Action" ボタンを除く。適切な機能がないため実装されませんでした)。